Introduction to the pasting method of fiberglass mesh

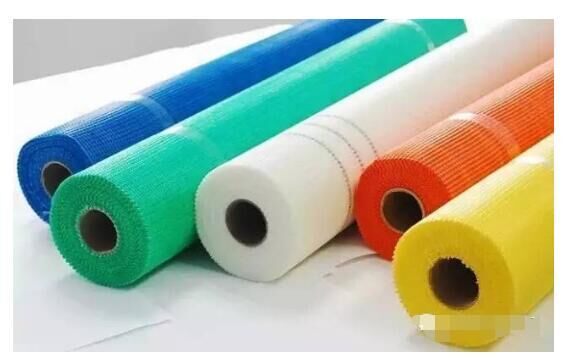
Fiberglass mesh cloth is based on fiberglass woven fabric and soaked in polymer anti-emulsion coating. Therefore, it has good alkali resistance, flexibility and high tensile strength in the longitudinal and latitudinal directions, and can be widely used for thermal insulation, waterproofing, crack resistance, etc. of interior and exterior walls of buildings. Fiberglass mesh is mainly alkali-resistant fiberglass mesh. It is made of medium-alkali-free glass fiber yarn (the main component is silicate and has good chemical stability) and is twisted and woven with a special organizational structure – leno tissue. After that, it undergoes high-temperature heat setting treatment such as alkali resistance and enhancer.

The main purpose of fiberglass mesh is widely used in wall reinforcement materials (such as fiberglass wall mesh, GRC wall panels, EPS interior and exterior wall insulation boards, gypsum boards, waterproof rolls, asphalt roof waterproofing, fireproof boards, Caulking tape for construction, etc.
How to paste fiberglass mesh cloth:
1. A dedicated person must be responsible for preparing polymer mortar to ensure the mixing quality.
2. Open the lid of the bucket by rotating it counterclockwise, and use a stirrer or other tools to re-stir the adhesive to avoid separation of the adhesive. Stir appropriately to avoid quality problems.
3. The mixing ratio of polymer mortar is: KL binder: 425# sulfoaluminate cement: sand (use 18 mesh sieve bottom): =1:1.88:3.25 (weight ratio).
4. Weigh the cement and sand in a measuring bucket and pour them into the iron ash tank for mixing. After stirring evenly, add the binder according to the mix ratio and stir. The stirring must be even to avoid segregation and porridge-like appearance. Water can be added appropriately according to the workability.
5. Water is used for concrete.
6. Polymer mortar should be prepared as needed. It is best to use up the prepared polymer mortar within 1 hour. Polymer mortar should be placed in a cool place to avoid sunlight exposure.
7. Cut the mesh from the entire roll of fiberglass mesh according to the required length and width, leaving the necessary overlap length or overlap length.
8. Cut in a clean and flat place. The cutting must be accurate. The cut mesh must be rolled up. Folding and stepping are not allowed.
9. Make a reinforcement layer at the sun corner of the building. The reinforcement layer should be attached to the innermost side, 150mm on each side.
10. When applying the first coat of polymer mortar, the EPS board surface should be kept dry and harmful substances or impurities in the board cotton should be removed.
11. Scrape a layer of polymer mortar on the surface of the polystyrene board. The scraped area should be slightly larger than the length or width of the mesh, and the thickness should be about 2mm. Except for those with hemming requirements, polymer mortar is not allowed to be applied on the surface. Polystyrene board sides.
12. After scraping the polymer mortar, the mesh should be placed on it, with the curved side of the mesh facing the wall, and smoothing it from the center to the surroundings so that the mesh is embedded in the polymer mortar. The mesh should not be wrinkled. After the surface is dry, apply a layer of polymer mortar on it with a thickness of 1.0mm. The mesh should not be exposed.
13. The overlapping length around the mesh should not be less than 70mm. In the cut parts, mesh patching should be used to overlap, and the overlapping length should not be less than 70mm.
14. A reinforcement layer should be made around the door and window wings, and the mesh cloth of the reinforcement layer should be affixed to the innermost side. If the distance between the outer skin of the door and window frame and the surface of the base wall is greater than 50mm, the mesh cloth should be affixed to the base wall. If it is less than 50mm, it needs to be turned over. The mesh cloth laid on the large wall should be embedded in the outside of the door and window frame and glued firmly.
15. At the four corners of the door and window, after the standard net is applied, add a piece of 200mm×300mm standard net on the four corners of the door and window, place it at an angle of 90 degrees to the bisector of the window corner, and stick it on the outermost side for reinforcement; Add a piece of mesh 200mm long and standard width to the window at the inner corner, and attach it to the outermost side.
16. Below the first-floor window sill, in order to prevent damage caused by impact, reinforced mesh should be installed first, and then the standard mesh should be installed. Strengthen the connection between mesh and cloth.

17. The construction method for placing the reinforcement layer is the same as that of standard mesh.
18. The mesh cloth pasted on the wall should cover the folded mesh cloth.
19. Apply the mesh from top to bottom. During simultaneous construction, apply the reinforced mesh first and then the standard mesh.
20. After the mesh is pasted, it should be prevented from being washed away or hit by rain. Protective measures should be taken for doors and windows that are prone to collision. Anti-pollution measures should be taken for the feeding port. Surface damage or contamination must be dealt with immediately.
21. The protective layer must not be exposed to rain within 4 hours after construction.
22. After the protective layer is finally set, spray water for maintenance in a timely manner. When the average day and night temperature is higher than 15°C, it shall not be less than 48 hours, and when the average temperature of day and night is lower than 15°C, it shall not be less than 72 hours.


